In my work life, there is a single constant – professional garb. Trousers, button-down shirts, and jackets have been my wardrobe staples. But times have changed – workplaces are more casual. More than that, I’m learning what I want to wear and it isn’t what’s in my closet. So it’s time to work on workwear.
Inspiration

Simple. Classic. Elegant. The white shirt.
One designer has seemed to focus on the white shirt as the basis of a woman’s wardrobe, and that’s Carolina Herrera. I love her stylish, elegant and mature designs. She doesn’t design clothes for girls, she designs clothes for women. She has taken the simple white shirt and made it a wardrobe staple. I’ve tried a variety of white shirts over the years and either the style (RTW button-down) or the fabric (creasy, crappy-looking-by-noon cotton) don’t work for me.
Pattern
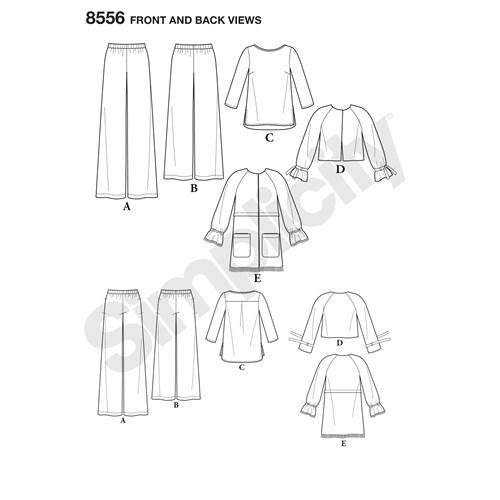
At this point in my life, tunics work for me, so for this project, I chose Simplicity 8556. I actually bought it for the fringe jacket, but then I noticed the tunic. It’s a basic shape but has some interest, which is about what I want for work.
Fabric
The fabric I used is labelled “Vintage Chirimen” crepe from Fabric Mart Fabrics. I was drawn to it because of the texture, drape, and colour. This has a creamy/eggshell tint that is kinder to my colouring. Since purchasing the fabric I did a bit of research and this fabric is commonly used for kimonos.
Sewing Notes
The fabric was not easy to work with. Let me clarify that – it was easy to sew but it was impossible to mark. I didn’t want to risk permanent pen or chalk marks, so I used tailor tacks – and the little tacks wouldn’t stay put. So I wound up using pins to mark the bust darts and the pleat in the back, and you KNOW that was just a bad idea! I had to pick out the darts and side seams twice when they weren’t where they were supposed to be and also completely unpicked the yoke AFTER it was encased and fully stitched. I’m still not thrilled with the bust darts, but what.ever.
The usual: This pattern needed an FBA, for which I used a pivot and slide. But it has a yoke in the back so that sent my brain reeling because it meant way more adjustments. In the end, I did the FBA on the front and just cut a size larger for the yoke. I have no idea if that was the right thing to do, but it worked!
The second adjustment I made was doubling up the yoke so it lies better and provides better structure to the top. This always seems to make a difference in how the back hangs, and it’s such an easy adjustment.
And the final, and biggest adjustment was adding sleeve ties. I’ve detailed my process below.
Creating Sleeve Ties
All year I’ve wanted a top with sleeve ties and this top was just the right shape, so I went in search of instructions online and asked on Pattern Review. In the end, I wound up doing what I thought would work best. Patting myself on the back because it worked pretty well.
Following is the process I used to add a tie to the sleeve.
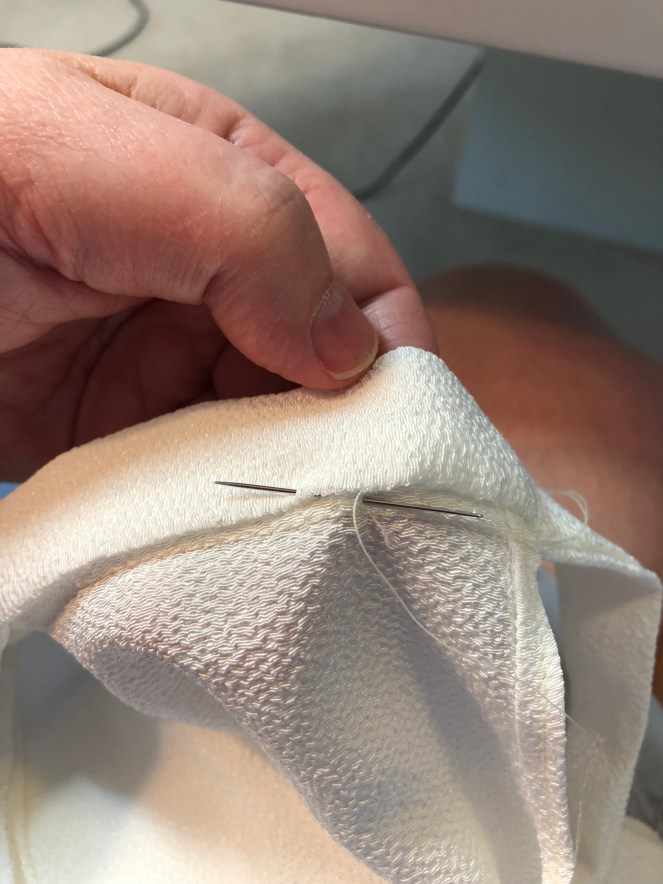
- Lay the sleeve flat (below). The sleeve seam is at the top of the picture. Cut a slash in the edge on the opposite side from the sleeve seam, meaning the opening would be on the outside of my arm. My cut was 3″ long.

2. Turn in the edge of the slash twice and stitch. (I first stitched on a piece of self-bias but it was bulky and difficult to get a crisp corner at the top of the slash.) An option is to cut a horseshoe-shaped opening, which may be easier to neatly finish either by turning or binding.

3. Cut the strips for the sleeves. The right length seemed to be about 8″ – long enough for the knot to be neat, yet not so long that they would get in the way.
The sleeve opening was 13″, so I cut bias strips 29″ x 3″ wide.
- 29″ = width of the sleeve + 8″ for one tie + 8″ for the other tie
- Width of tie = 1″ wide double folded, allowing for a 1/2″ seam allowance

4. Cut interfacing as long as the strips and half as wide, and fuse to the fashion fabric.

5. Stitch the sleeve ties onto the unfinished edge of the sleeve, right sides together and centring so the ties are the same length.

6. Place the tie extensions right sides together and stitch from the edge of the sleeve out to the end of the tie, tapering at the end so there is a point or curve (your choice).
7. Trim the stitched edges of the tie and sleeve. Turn the tie extensions right side out, using a pointer as necessary to make seams open fully.
8. Press and then close up the cuff by stitching the inside edge by hand.
Simply put, this is a cuff with really long extensions!
I am pleased with how well the ties turned out. The scale and length are just right.
Result
Overall, I’d say this is a win. The opening of the sleeve could be a tad cleaner, but it doesn’t scream, “look, homemade!” The crepe was the perfect choice for this style, and this is a great addition to my work wardrobe. The fabric is a tad translucent however that is easily remedied with a lightweight cami or vest underneath. The only disappointment is the bust darts, and I’m contemplating taking them back an inch so they aren’t as apparent.
The sleeve ties add interest without being so voluminous that you can’t get on a jacket. This one will be on the year-round work rotation!


This is a definite win. I love the fabric choice, and I like what you did with the pattern. I have an observation that I hope you accept in the spirit in which it is given. I learned this myself, so I am sharing. The real problem with your bust darts is that they point down rather than up. Bust darts should always go up in order to lift the bust. I still say this is a win, but if you make this again, I would redraft the darts. Other than that, it looks pretty perfect to me.
LikeLiked by 1 person
Thank you, Becky! This is an excellent observation and tip, and I sincerely appreciate you educating me. That’s part of the FBA lesson that I had missed, but I will remember for the next one.
LikeLike
That sure looks like tricky fabric Janine! I’d say you did a beautiful job!
xo
sis
LikeLiked by 1 person
Thanks! I need you to be closer so you can be my photographer!
LikeLike
This looks good on you and should be really useful. Mom
LikeLike
I just used your tutorial for sleeve ties on a popover, and they turned out GREAT! Thank you for pointing me this way. Your ivory crepe top is sensational. 🙂 ~stirwatersblue from PR
LikeLiked by 1 person
Thank you! I’m so glad it was helpful. Have you posted your top yet?
LikeLike