A couple of years ago I bought the Craftsy class on industry sewing secrets (“Sew Better Sew Faster“) taught by Janet Pray. The class came with the Jacket Express pattern from Islander Sewing Systems. I didn’t watch the class and just filed the pattern away.
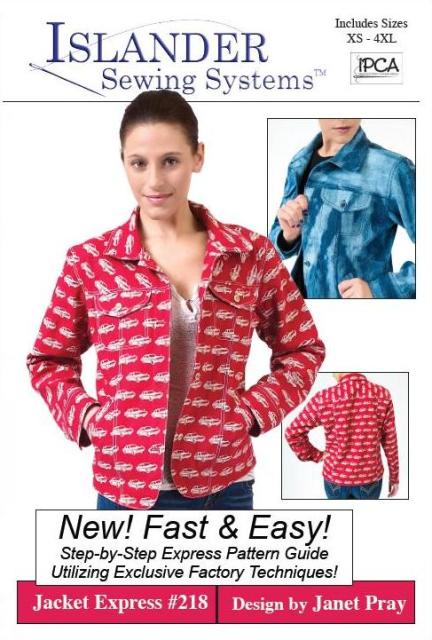
My Bespoke PJs got me into Round 2 of the Pattern Review Sewing Bee. This week the challenge was to make an adult garment using ONLY recycled denim. I needed a pattern for a garment that I would actually wear on a regular basis AND said pattern needed to be comprised of many small piece. Jacket Express met the bill on the latter, and I could make a few changes to the design.
I convinced my husband to give up a couple of pairs of jeans but everything else came from the local Goodwill where I managed to find a calf-length denim dress, a pair of ladies jeans in stretch black denim and a pair of men’s jeans in size 48. The denim below is what I started with. I didn’t use the garments that are marked with red X’s.

For about an eighth of a second I considered spending time picking out the leg seams but I had enough denim so why bother. Then I set about laying out the pattern pieces so the colours would look okay. The black jeans provided just enough for the front and back side panels, the inside panel of the sleeves and the cuffs. Black is slimming, right? 🤣

To make this wearable for me I first decided that I didn’t want the rounded collar. There’s a facing all the way around the garment so I simply drafted a piece of facing for the back neck. Then I skipped the breast pocket flaps because they would scream ‘1980s jean jacket.’ My denim was pretty heavy weight so I also left off the welt pockets as they would add bulk. This was going to be a jacket made of denim, not a jean jacket. Once all the pieces were cut I interfaced everything and it was …
Time to Sew
Although I had access to the Craftsy class (4 hours!) the instruction booklet is excellent so I didn’t bother with watching the video. I’ve attended a couple of Janet Pray’s classes at sewing events so am familiar with how to place the hands and hold the fabric so you take advantage of the feed dogs.
I put a denim needle in my machine, threaded the serger so the thread colours would work with my denim and set to work, following along with each step. The instructions are in the order needed to give a professional finish while still constructing with some speed. There is a LOT of jumping back and forth between stitching a seam on the machine, then over to the serger, then the iron, then back to the machine which now needs topstitch thread, stitching two rows and changing back to poly thread … But the results were really good right from the start so I just kept following along. All of the steps made sense, especially since there’s so much top stitching.

There was only one point when I watched the video and that was for the cuffs. The instructions in the pattern booklet were a bit of a head scratcher and since my project was completed, I’ve read several reviews that said the same thing. I managed to get them done right without any hand stitching. Actually, the only hand stitching in the whole project was slipstitching the back facing over the yoke and sewing on the shank buttons. Gotta love that!
One thing I wish I had done was use my cover stitch machine. Since I hadn’t used the pattern before I wasn’t sure if that would fit in and it definitely would. In a few cases you’re instructed to stitch just a single line of topstitching but in most cases it is two lines.

A surprise that I hadn’t considered was an interesting geometric design that appeared when I left off the breast pocket flap. The pocket is sewn to the interior of the garment (I used pockets from a pair of jeans) and then a facing is added. This meant that there was an opening that was highlighted nicely by the colour blocking.
This wasn’t supposed to look like a standard jean jacket so I added straps at the waist – you know, the kind that you can tighten up when you’re smaller and loosen up when your waist expands? I just unpicked two jeans waistbands and stitched them at the side panels. I like the look and at some point I can add another button hole to cinch the waist in a bit. 😉

Part of this contest is always going above and beyond so I considered different embellishments. My initial thought was bleach painting but the black denim just turned copper. Then I thought about machine stitching a row of leaves and adding rhinestones for flowers. In the end, I skipped all of the bling stuff because I don’t think I’d wear the jacket if it was flowery or too feminine.
One thing I’ve learned over the past few years is that I prefer simple garments without a lot of embellishment, especially for things like jackets that I’ll wear frequently. A wild print is fun for a dress or a top but all that colour and print has to be balanced with clean shapes. For this, I decided that less is more.
Several sewists I follow on Instagram have embroidered phrases and thoughts inside their garments so instead of putting a design on the outside, I used the lettering feature on my Brother PS500 and stitched a quote on the inside of the hem facing. For everyone this has been a really hard year and I wanted something quiet that would reinforce my optimism every time I put on the jacket.
Even if I knew the world would fall to pieces tomorrow, I would still plant my apple tree.
Martin Luther

Once that was done and all of the necessary topstitching completed, I added the buttonholes and buttons and was done!
For the purposes of the contest, this was completed in almost exactly six days (Sunday noon through Saturday noon). Other than thrifted denim, I used interfacing, thread and buttons. (The buttons were from a big bag that I got at FabricMart in November.)
Summary
This is one of my better projects. It doesn’t feel like a jean jacket. And the interior looks good enough that I would throw it over a chair in a public place and not be worried about raw seams.
The basic construction of the jacket was far easier than I expected. The instructions are so good that I think a beginner could tackle this project. You need to be pretty present when doing the topstitching and the seam allowances aren’t large (1/4″ or 3/8″) so there isn’t much room for error.
Would I use this pattern again? Yes! Next time I would add a few inches to the length but this might be awfully nice in brocade or velvet. Hmmmm …


Stunning! Good luck!
LikeLiked by 1 person
Thanks, Suzanne!
LikeLike
Wowzers Janine! That’s really beautiful! The fit is PERFECT!! Good Luck in the contest!!
LikeLiked by 1 person
Thanks! That was mostly luck 🍀 😆
LikeLike
Very creative! I like the black with blue.
LikeLiked by 1 person
Thank you, Ellen!
LikeLike
Well done, Janine! It doesn’t look like it came from old clothes at all. I love these kinds of challenges.
LikeLiked by 1 person
Thanks, Martha! It was fun and I feel a bit inspired to look at Goodwill again.
LikeLike
Chic little jacket! I like the way the fabric combination looks completely natural in the design.
LikeLiked by 1 person
Thank you! I had hoped to find some fun prints or colours at Goodwill but the black seemed to work out well 🙂
LikeLike
Love your blog. I’ll be back to check it out again!
LikeLiked by 1 person
Thank you so much for reading my blog!
LikeLike
Very chic — the inside embroidery is so “extra”. I love this jacket and would wear it myself. Hope you make it to the next round of the sewing bee.
LikeLike
You ended up with a very wearable jacket after such creative use of recycled denim! Kudos!
LikeLiked by 1 person
Thank you! I’m pretty pleased with this one.
LikeLike
This is such a professional job resulting in a gorgeous jacket!
LikeLiked by 1 person